A Fresh Coat

A Hotel for Dogs (Part 2)

Interior DesignJenny SulpizioComment

Wow! I was blown away by your response to the first four rooms at the new Hotel for Dogs! It’s such a neat space and sweet little niche for our canine companions, isn’t it? I so loved the opportunity to design and create these spaces and I have to tell you—the owners gave me full creative liberties when coming up with these rooms. Seriously, sweetest gig ever!

Okay, so how ‘bout sharing some more rooms? The next six (6) kennels are a tad smaller and structured differently in that I could only paint/decorate a small area. However, these are perfect rooms for small to medium-sized dogs and offer just as much cuteness and character. For reals.

Also? My apologies in advance for the quality of these pics. Lighting was an issue because with 100 degree temps, all doors were closed, and the AC was cranking. Spoiled pups. ;)

Okay, here we go:

  1. Love Me Tender: I love Basset Hounds. Having one of my own (George), I desperately wanted to theme one of these rooms around this adorable breed. Not to mention the fact that Basset Hounds gained major notoriety/popularity after Elvis released his famous song, “Hound Dog.” So, after marrying the two together, here’s what I designed:

Love Me Tender.jpg

Love Me Tender

Sweet (!) artwork mixed with a rock n’ roll theme and the saddest puppy eyes ever…

And here is the result. Each of these amazing pieces was found on Etsy by some amazingly talented people. They literally make the whole space. George is so staying here! ;)

IMG_8071-2.jpg

Hobby Lobby gets the assist on this one. Also? If you’re in need of really reasonable framing, make sure to visit Jason at the Yuma Hobby Lobby. He helped me frame everything on the cheap and in keeping with the theme of each room. Oh, and the musical note? It only came in black…nothing that a little metallic spray paint can’t fix. ;)


2. Oui Oui, Paris: Poodles and Paris. The two go hand in hand and when designing these rooms, it was a much needed theme. Besides, Paris is always a good idea, right? Shades of pink with accents of black and white mixed with some sweet artwork, make this room tres manufique!

Oui Oui Paris.jpg

Oui Oui, Paris

Pink, and black, and white all over. Mua!

IMG_8088-2.jpg

Once again, Etsy for the win when it comes to the artwork, Wayfair for the bedding (how cute is that?!), and Hobby Lobby for all the frames and details. Whether you have a poodle or not, this room is super sweet.

3. The Regal Beagle: Doggies dressed to the nines in prestigious retro garb wearing monacles and top hats? Yes, please! With a deep blue backdrop, gold accents, and a sweet leather lounger, this room is sure to be a hit.

The Regal Beagle.jpg

The Regal Beagle

Loyatly is Royalty!

IMG_8089-2.jpg

4. Desert Oasis: I thought it would be fun to pay homage to our little neck of the woods here in AZ. With the desert as our backdrop and beautiful sunsets to look forward to each and every night, warm tones, cacti, and a little Route 66 nostalgia were a must for this space.

Desert Oasis.jpg

Desert Oasis

Get your kicks on Route 66

IMG_8073-2.jpg

I know, I know—you’re tired of hearing it but Etsy and Hobby Lobby, and yes, Wayfair too is where all of these items were purchased.


5. Roughing It-The Cabin: Labradors and hunting, and fishing, and cabins all came to mind when designing this niche. And hey, this room is perfect for when you can’t take your hunting buddy with you on the next not-going-to-the-woods outing. Rustic for sure, comfy by far.

Roughing It-Pooch Parlor.jpg

The Cabin

“Roughing It,”or should we say, “Ruffing It?”

How about that bed? How much fun is that?!! Combined with the decor and deep green backdrop, I know a lot of doggies who will look pretty sweet (and quite cozy) in these digs.


6. Play Ball: Last but definitely not least is our baseball themed room. Baseball is arguably America’s favorite pastime and dogs looove playing ball (except for my George). Mix the two and you’ve got one fun little space to leave your pup while you’re away.

Play Ball.jpg

Play Ball!

America’s favorite pastime and a dog’s favorite object to fetch.

IMG_8076-2.jpg

Alabaster white paneling with red stitching detail, and the cutest Scottie artwork you ever did see (well, at least I think so). A super plush, cozy bed and this room is a dog-gone (I couldn’t resist) awesome!

Whew! A ton of work but a ton of fun, you guys. Such a treat to be able to share these with you, too. Now go book your favorite room before somebody else does. Special thanks to The Southwest Exchange/Pooch Parlor—such a great place for pups.

Love,

J

A Hotel for Dogs (Part 1)

Room InspirationJenny SulpizioComment

Yep, you read that right. For the past four (+) months I’ve been working on this semi-top secret project that I’ve been itching to share with you—and now I finally can! It was definitely hard to keep this all under wraps…especially when my clients are the cutest puppies, and my job included designing a slew of canine rooms. Sweetest gig ever!

If you have yet to board your pup at The Pooch Parlor here in Yuma, AZ, then by all means do so now. Not only are their boarding facilities the most fun (according to me), but the play area on this facility boasts a ball pit, doggie tube, water feature, and just a ton of overall fun. Plus, their posh puppy rooms are air conditioned. Perfect for this Yuma heat.

But before I blabber on too much, let me introduce you to the first FOUR themed rooms located in this hotel for dogs.

  1. Central Bark: With the NYC famed park as the design inspo for this doggie room, I wanted to infuse super bright colors, cool patterns, and fun artwork. After searching Etsy, I literally found everything I needed. Everything! Love me some Etsy.

Central Bark.jpg

Central Bark

A beautiful shade of green serves as the backdrop for some ultra bright artwork and decor. Fun & festive!

The design board was a snap to create. The hard part was limiting the number of pieces I could use in each room. However, here is the end result:

Central Bark copy.jpg

I know where my pups will be staying next time we’re out of town. Even better? See that doggie door on east facing wall? That leads us to our next room and two dogs can have access to one another which is such a cool feature if you have more than one pooch like me.

2. Home Sweet Home: I wanted to include a feminine option to one of these four large rooms and what better way to keep those pooches from getting homesick than to provide them with a space like this? LOL.

Home Sweet Home.jpg

Home Sweet Home

“Whistler’s Mother” rocking her pooches along with soft, pastel colors that soothe.

And the completed room…

Home Sweet Home.jpg

This room was a lot of Hobby Lobby, along with some Etsy, and a hint of Wayfair. And seriously? How about that bed? Awesome. I only wish I could lay down a braided rug to complete this look but we all know how hard dogs are on rugs. Oy.

3. Salty Dog: I don’t know about you but this summer I’m heading to the beach. Dogs (most dogs) love the beach as well so why not give them what they want? A beach themed room? Done.

Salty Dog.jpg

Salty Dog

Cool coastal colors mixed with beachy/rustic decor complete this pooch palace.

Here she is…

Salty Dog.jpg

Equal parts Hobby Lobby and Etsy on this one (and some Wayfair). So simple but still super fun…and beachy (minus the sand).

4. The Bachelor Pad: How could I not? Creating the vision board for this room had me in a fit of giggles. I’m not even kidding. Conducting searches for “Pin-up dog” amongst other bachelor type doggie items was just too. much. fun.

Bachelor Pad.jpg

The Bach Pad

Poker dogs, a large sofa, and pin-up’s. Yah, this definitely happened.

Bachelor Pad.jpg

Make sure to reserve this room soon. I have a feeling there might be a waiting list.

Stay tuned because the Pooch Parlor has SIX more rooms (I designed) to offer you. Even better? They’re having an Open House THIS WEEKEND on Saturday, April 27 from 10-2! There’ll be guided tours, drawings for prizes…the works! I’m so going and bringing my pooches with me too.

What do you think? Would you be down to board your dogs in digs like these?

Part 2 coming soon!

Love,

J


Superhero Skyline...

Wall MuralsJenny SulpizioComment

I love a good superhero room and it’s been a really long time since I’ve had the opportunity to do one. So, I was pumped when asked to implement a cityscape skyline for two little boys’ shared room.

Now, there are a number of options when it comes to doing these. However, I wanted to keep it simple so the boys could grow with their room—and after talking to the homeowner—she agreed. The only addition we might make? Possibly adding windows.

But here is where we started…

City Skyline-A Fresh Coat Yuma 01.jpg

And here is the end result:

City Skyline-A Fresh Coat Yuma 07.jpg

Baseboards will eventually be added just as the wall will be patched where the doorknob went through it. In the meantime though, here are the details on how to achieve the same thing in your kiddo’s room.

1. Surf Pinterest: Like I said before, there are a ton of options when it comes to creating this mural. Do your homework and decide which look you like best.

2. Color Selection: I opted for Sherwin William’s Dovetail and Valspar’s Dark Kettle Black. This is the color combo I used on my son’s room a few years back and I really like how well they work together. You could opt for blue tones though—totally up to you. The cool thing is these wall murals are completely customizable (is that even a word? I think it is but I’m not positive. I’m going with it though). Even better? I purchased three sample sizes of paint and that was all I needed for this whole project. Pretty cool when projects are so inexpensive. Like, less than $20!

3. Tool Time: Grab your trusty level (at least a two footer), detail brushes (angled ones work best), some trim brushes (2”, short handle), a pencil and then get to work. I started by creating these geometric shapes off of the picture I had saved to my phone. Using the level to draw different angles is really easy and super fun. Start at the top (if opting for a silhouette), and then work your way to the bottom.

City Skyline-A Fresh Coat Yuma 02.jpg

4. Sticky Stuff: Once you have all the sections taped and ready to go, it’s time to paint. Start with the silhouette skyscrapers first. Add two coats. Allow enough time to dry. Remove tape and then begin working on the bottom section of the mural. Follow the same steps as you did before.

Also? Expect to use 2-3 coats of the black.

City Skyline-A Fresh Coat Yuma 03.jpg

6. Detail Work: Once the walls are dry and the tape has been removed, touch-up’s will more than likely be necessary. Grab one of your small angled brushes and fix the areas in need of tending to. Make sure not to get too much paint on your small brushes to avoid globs and drips.

City Skyline-A Fresh Coat Yuma 05.jpg
City Skyline-A Fresh Coat Yuma 04.jpg

7. More Details? Once the fixes have all taken place, it’s up to you how custom you want to make this wall. Windows take a decent amount of work and are a bit tedious but also look amazing. If your son is like mine, the Batman call signal is a necessity. A bit harder to do but simply surf Pinterest and complete the same steps I’ve outlined here.

8. Enjoy. This really is such a fun mural and makes a big impact for hardly any money.

**Total time? Expect 1-1 1/2 days with taping and drying time, 5-6 hours without taping.

City Skyline-A Fresh Coat Yuma 06.jpg

Love,

J


Fireplace Reno...Just in Time for Christmas

Fireplace RenoJenny SulpizioComment

As I sit down to write this post we are exactly T-3.5 days until Christmas…and counting. Seriously, I have no clue where December went but I do know that a major project in my home is officially finished as of today—just in time for Christmas.

And I couldn’t be more excited!

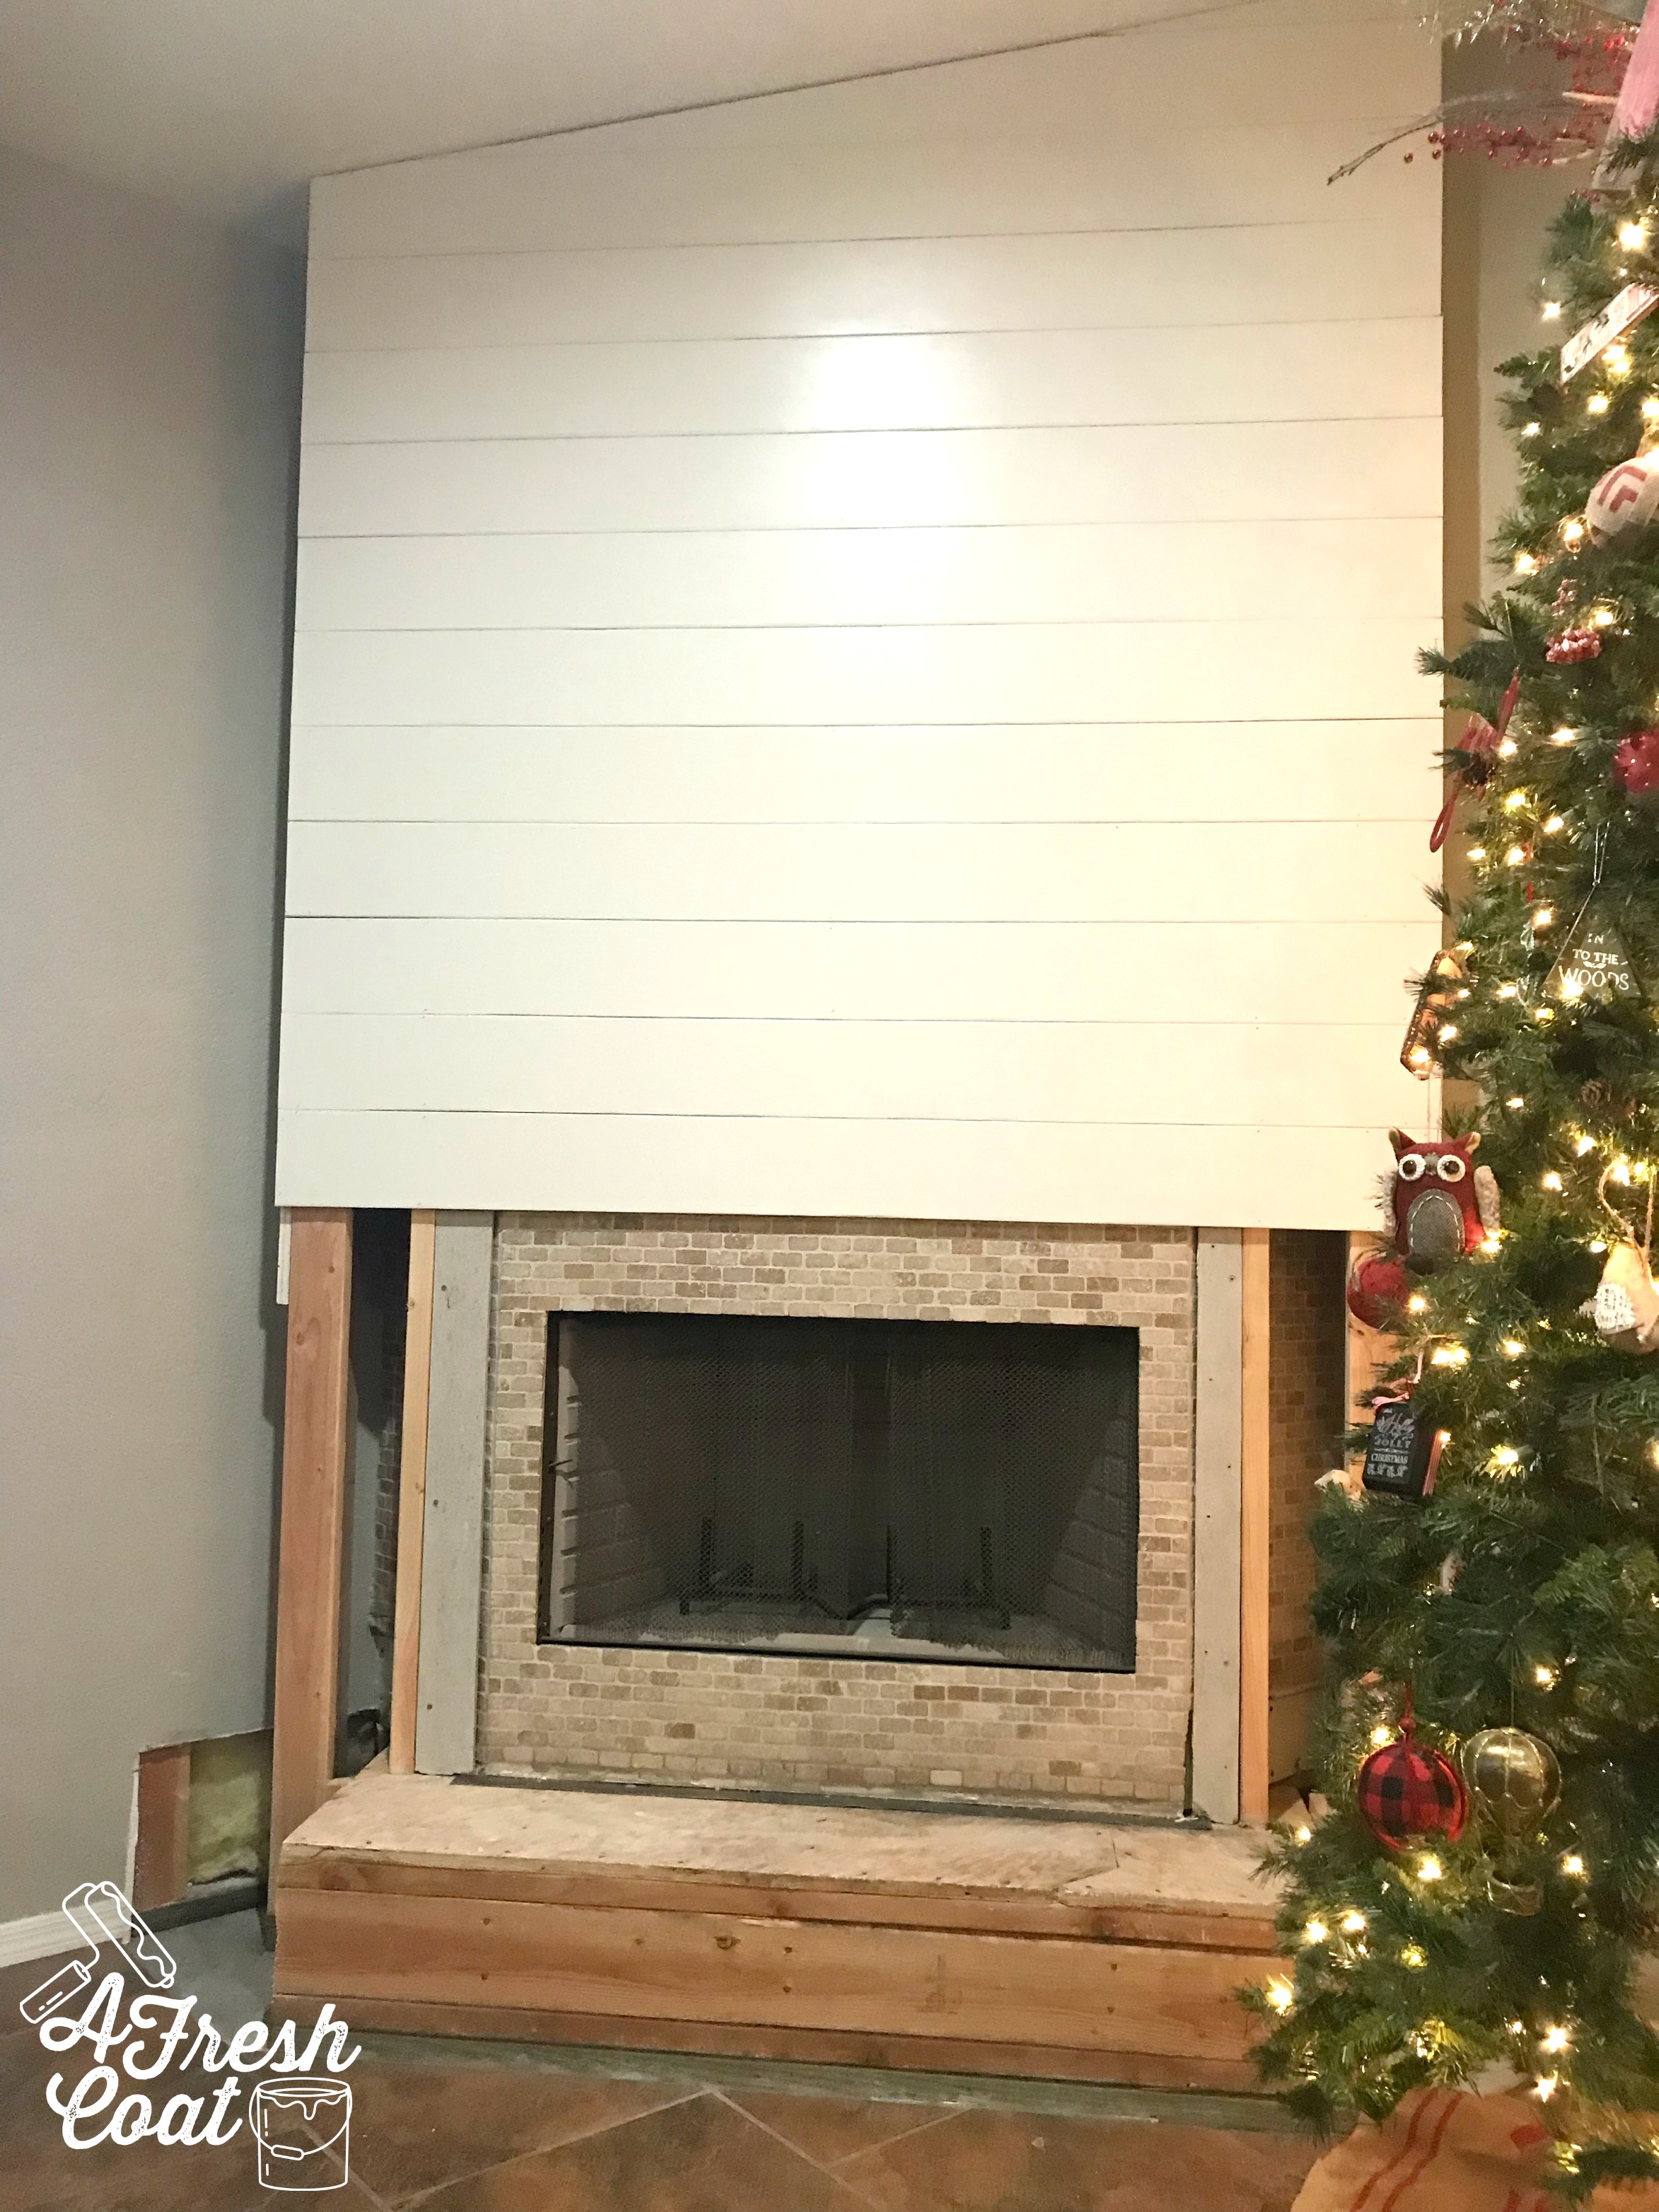
When we moved into this house over four months ago, I knew one of the first things I wanted to renovate was the fireplace. The previous owners had done a nice job adding their own touch, but it just wasn’t me. There wasn’t a mantle, really-—a ledge would be a more accurate description—and the angles of the unit were off, just as the hearth was a bit strange with varying heights in addition to. It just wasn’t working and as the focal point/center of the family room, it needed some help.
I knew I wanted shiplap. White shiplap. I also knew I wanted a big, chunky, rustic mantle as well (10” deep, 8” high, and 54” wide to be exact). Oh, and concrete. I wanted the look and feel of concrete on the fireplace surround to add a more modern feel to it.

After searching on Pinterest and meshing multiple images and ideas , I was able to visualize the design of the new fireplace, the desired materials, and the goal for the new hearth.

But before I get way ahead of myself, here’s where we started along with where we finished. I still can’t believe the transformation. It turned out even better than I had hoped!

Fireplace Reno 4.jpg
Fireplace Reno-A Fresh Coat Yuma 2-2.jpg
Fireplace Reno 5.jpg
Fireplace Reno 3.jpg

Here’s how it all went down.

1.) Shiplap: I recruited —okay, begged(!!)—local carpenter, Nate Koogle to tackle this project for me, and once he agreed, he busily got to work. After sanding down the 16 pieces of pine boards needed for the new fireplace, he then handed them off to me for painting. I used Sherwin Williams’s Alabaster (my fave for trim and molding work) in a semi-gloss finish. Honestly, I didn’t even prime these boards like I should have. I just slapped on three coats and boom! Done.

2.) Framing: Nate figured out everything about this project. The new angles along with the necessary framing needed to transform the shape of the unit. Once the framing was in place, the shiplap boards made their way up.

3.) Mantle: As I stated earlier, I knew I wanted rustic, thick, and chunky and after searching on Etsy, I narrowed down my search to one seller. The only problem? The $150 to ship it. I just couldn’t justify spending that amount. It was actually painful thinking about it. Instead, I contacted Kyle Hardin (Hardin Development in Yuma, AZ), to make one for me. It was done in less than a week and I love how it turned out. The perfect dimensions for sure.

Fireplace Reno-A Fresh Coat Yuma 3.jpg

Kyle delivered it unstained as requested. I mixed Golden Oak and Classic Grey stains together in a 1:1 ratio and wiped it on. I then added a small amount of Dark Walnut into the mix to give it a bit more “umph.”

Unfortunately, I had to omit those awesome corbels because once the mantle was secured into place, the corbels were too long and big. I was bummed but still love the outcome.

4.) Tile: Okay, this was the hardest and easiest part og the whole project. I knew I wanted the look of concrete and wanted the finish to appear seamless. I didn’t necessarily want to pay for the construction of a complete concrete surround, so I committed to finding a grey tile in 48” dimension (length) instead. Locally, I was out of luck so I resorted to looking online instead. Wayfair had just what I needed *cue jingle* and the price? $60 with free shipping. Not bad.

Gris+24%22+x+48%22+Porcelain+Field+Tile+in+Gray.jpg

However, here’s where it got a little hairy.

Due to the size of the tile, it needed to ship via freight carrier. Shipping took a month and when it arrived, it was the wrong tile! I was so bummed. Wayfair replaced it, no problem, but I had to wait another three weeks to get the tile I originally ordered. Labor of love for sure and a serious test of my patience but it was worth it.

BUT(!), when the tile came in, I wasn’t overly excited about how it looked in person. The color seemed slightly off—less gray and more of a brown. I kind of freaked so I ran to the boneyard of a local tile facility and found two different options just in case.

My anxiety was put to rest though. Once Kyle made the cuts, the look was perfect! Seamless (for the most part), inexpensive, with a hint of movement like I wanted, and the modern farmhouse look I was hoping for for the focal point of my home.


One project done and many more to go. As for the rest of this space—new flooring has to take place and I’m itching to add some board and batten moldings to the TV/adjoining wall. I think I may enclose the fireplace with a custom fit screen also. But here’s a little before and after of what’s transpired thus far in just four short months.

Fireplace Reno-A Fresh Coat Yuma 1.jpg
Fireplace Reno 9.jpg

Merry Christmas, friends and Happy 2019!

Love, J

The Details:

Paint: SW Alabaster in semi-gloss finish—Lowe’s.

Carpentry & Tile: Nate Koogle and Kyle Hardin

Tile: Wayfair—Grey Gris 24’x48”

Mantle Decor: Hobby Lobby and Dandy Home & Ranch

Clock: Bellacor


FIESTA FOREVER!

PartiesJenny SulpizioComment

I love party planning (love-love) but haven’t had the opportunity to do so in a long time…until now.

“N” called me back in July wanting to do something special for her 40th birthday—a “fortiesta” if you will. She already had a vision—along with a Pinterest board filled with ideas—and was ready to get started.

After securing the band (Last Call of Yuma, AZ is amazing), the food (delicious tacos with all the fixin’s from Isidro Lopez), and the beverages, it was time to talk decor.

“N” wanted this fiesta to be “classy trashy” (so fun), with a hint of rustic for good measure.

The end result?

See for yourself.”

Fortiesta 13.jpg

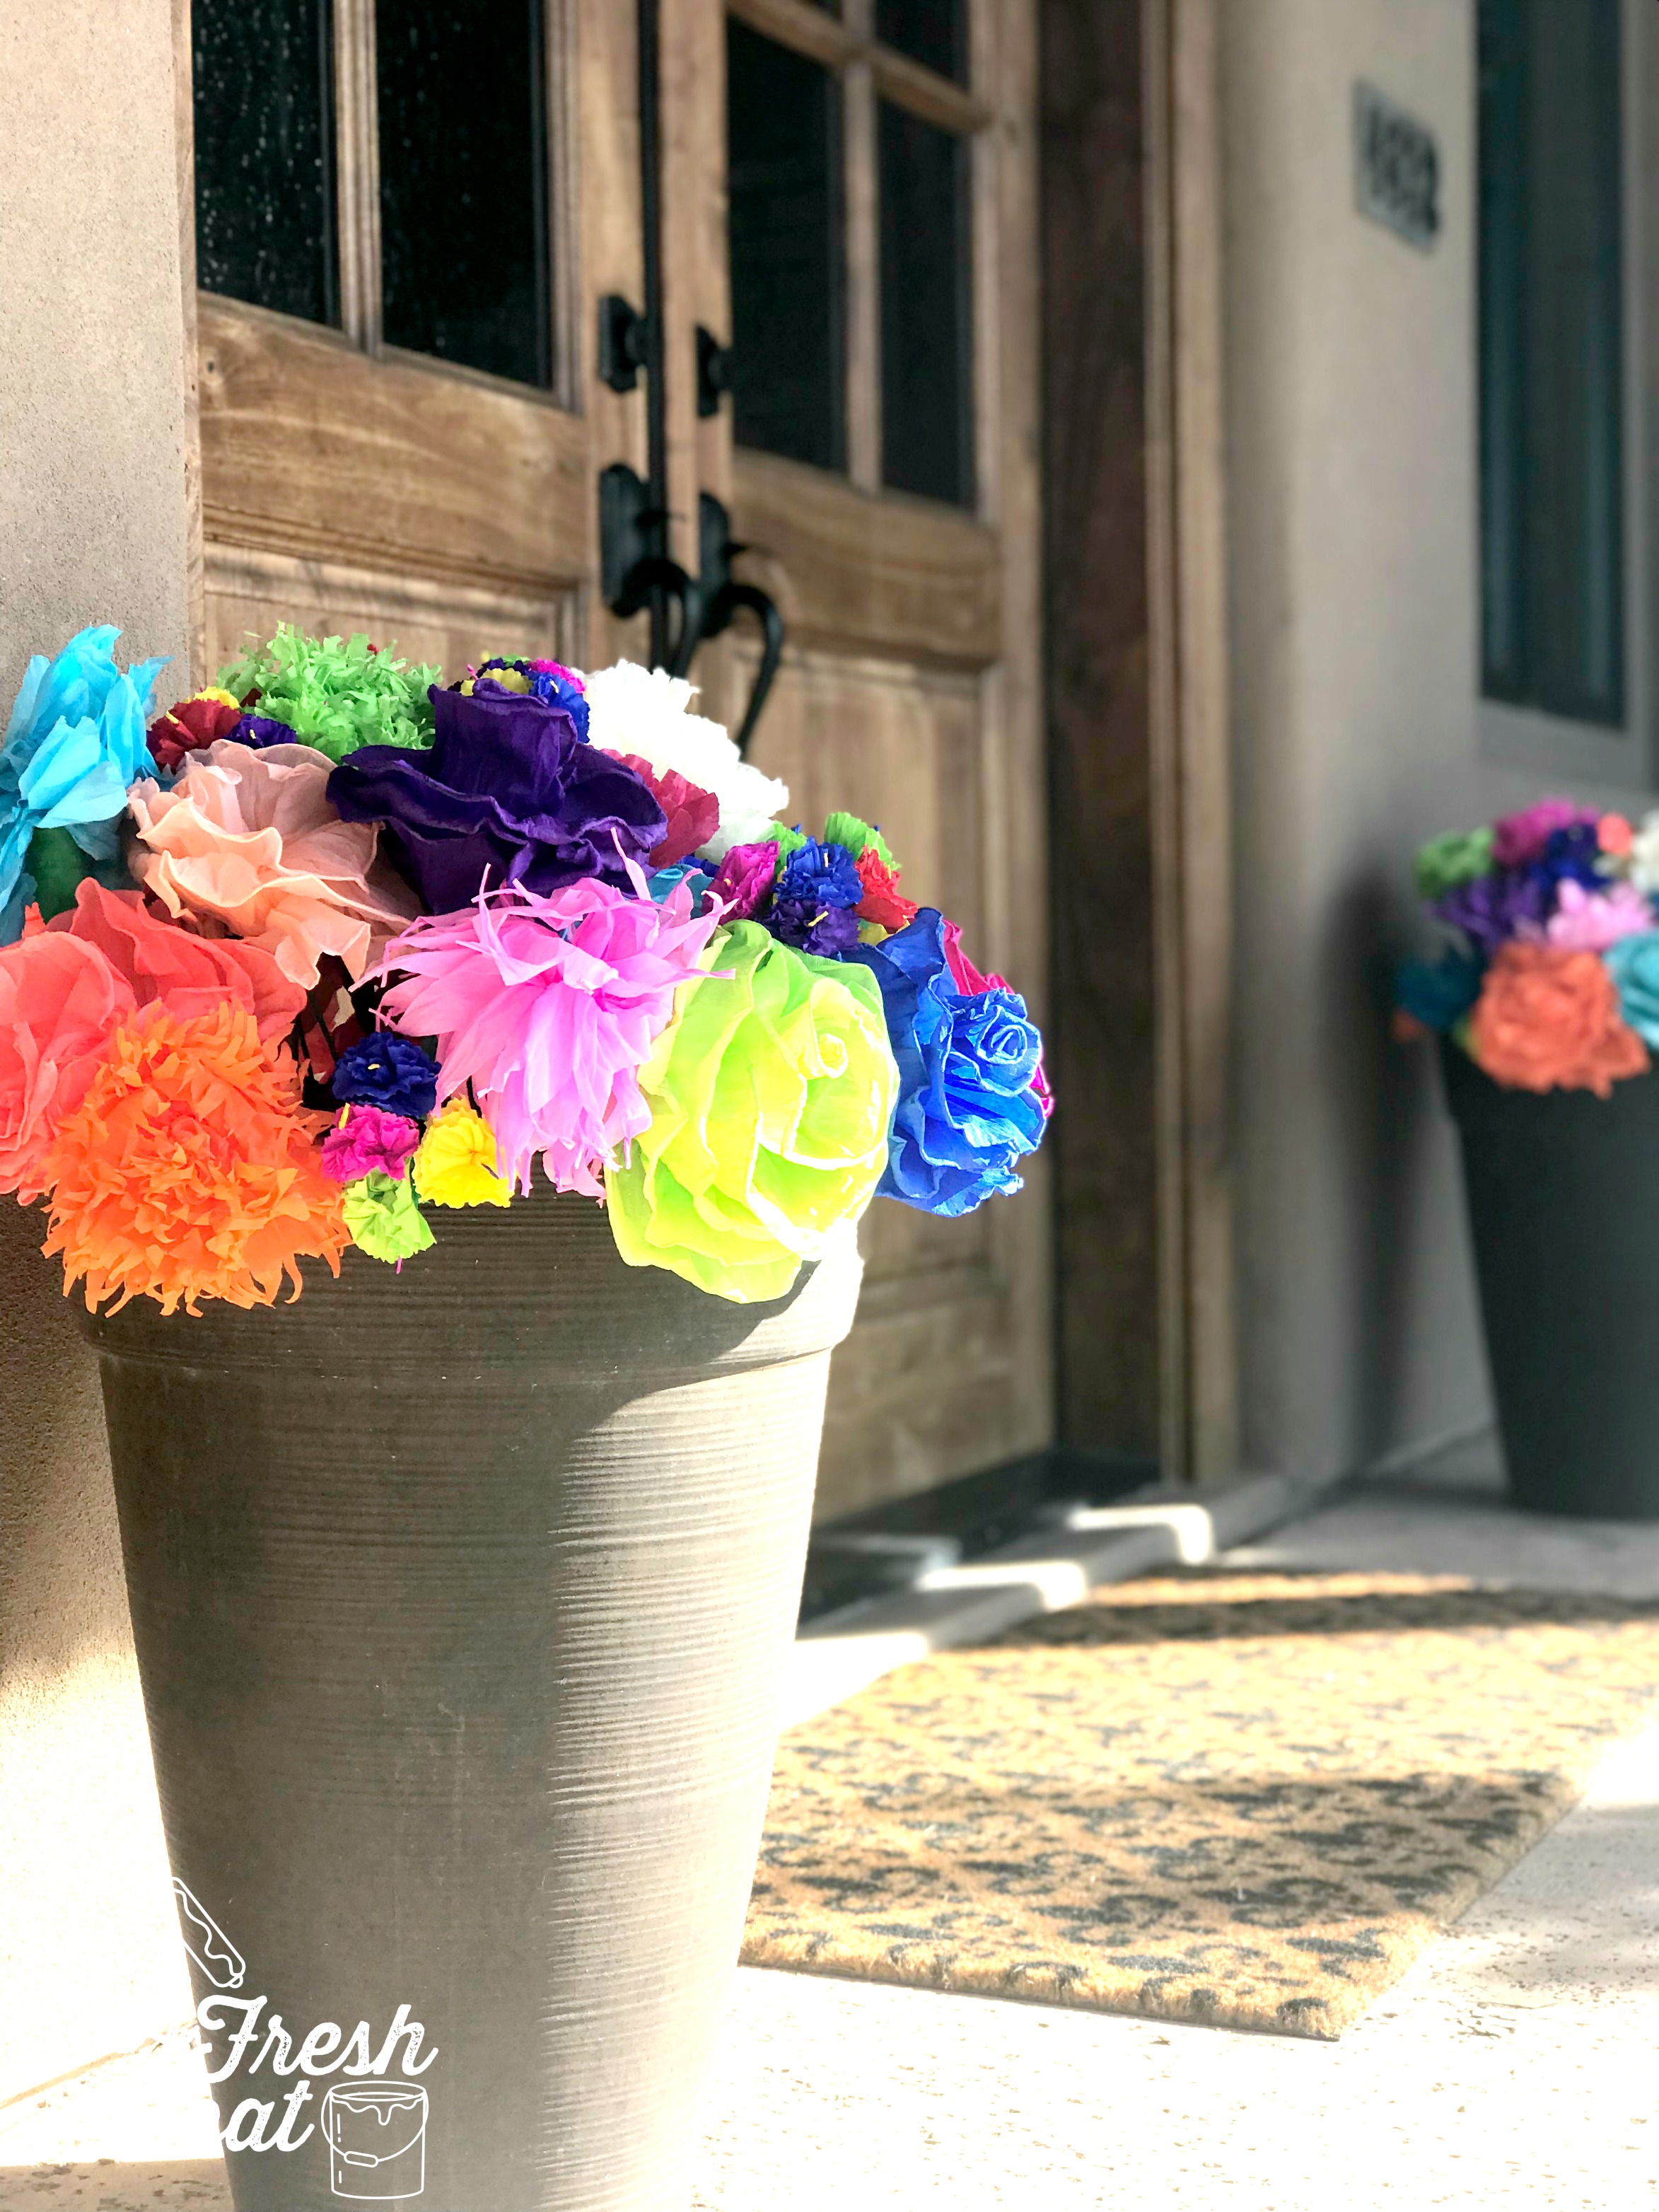
We started with these super colorful paper flowers for a welcoming entrance. The pots were already part of the front porch decor so it was as simple as removing what was there and slipping these bad boys into place. So cheerful…so fun!

Next up? The centerpieces and table decor. “N” knew she wanted succulents, with a few flowers and some candles too. Lisa Brazeel from Fortuna Floral made this all come together. The plants she chose and the items she provided for the party were absolutely perfect!

Fortiesta 4.jpg
Fortiesta 8.jpg
Fortiesta 9.jpg
Fortiesta 5.jpg
Fortiesta 7.jpg
Fortiesta 12.jpg

So pretty! The succulents, the flowers, along with those galvanized plants filled with succulents were so vibrant—the perfect touch, really. However, these shots were taken just before sunset. The real magic—the kind that only lighting can bring—was about to take place.

And how ‘bout this nacho bar complete with nacho cheese and plenty of chips to dip? Way fun!

Nacho Bar.jpg
Fortiesta 10.jpg
Fortiesta.jpg

This photo backdrop from Lisa Brazeel was awesome. Yards of ribbon in various colors and textures , cacti garland, and plywood plank boards for the final touch. So great!

Fortiesta 11.jpg

Last but not least were the cupckaes. These were amazing! “N” chose margarita, pina colada, and Snickerdoodle flavors (with added churros) and buttercream frosting from local baker, Buttercream Dreams. Beyond delicious.

Fortiesta 3.jpg

It was such a wonderful evening filled with great food and beverages, awesome music, delicious desserts, and tons of fun and laughter. I was so honored to be asked to plan this event and am so tickled with how everything turned out.

Fiesta forever!

Love, J