A Fresh Coat

TTU Dorm Room

Jenny SulpizioComment

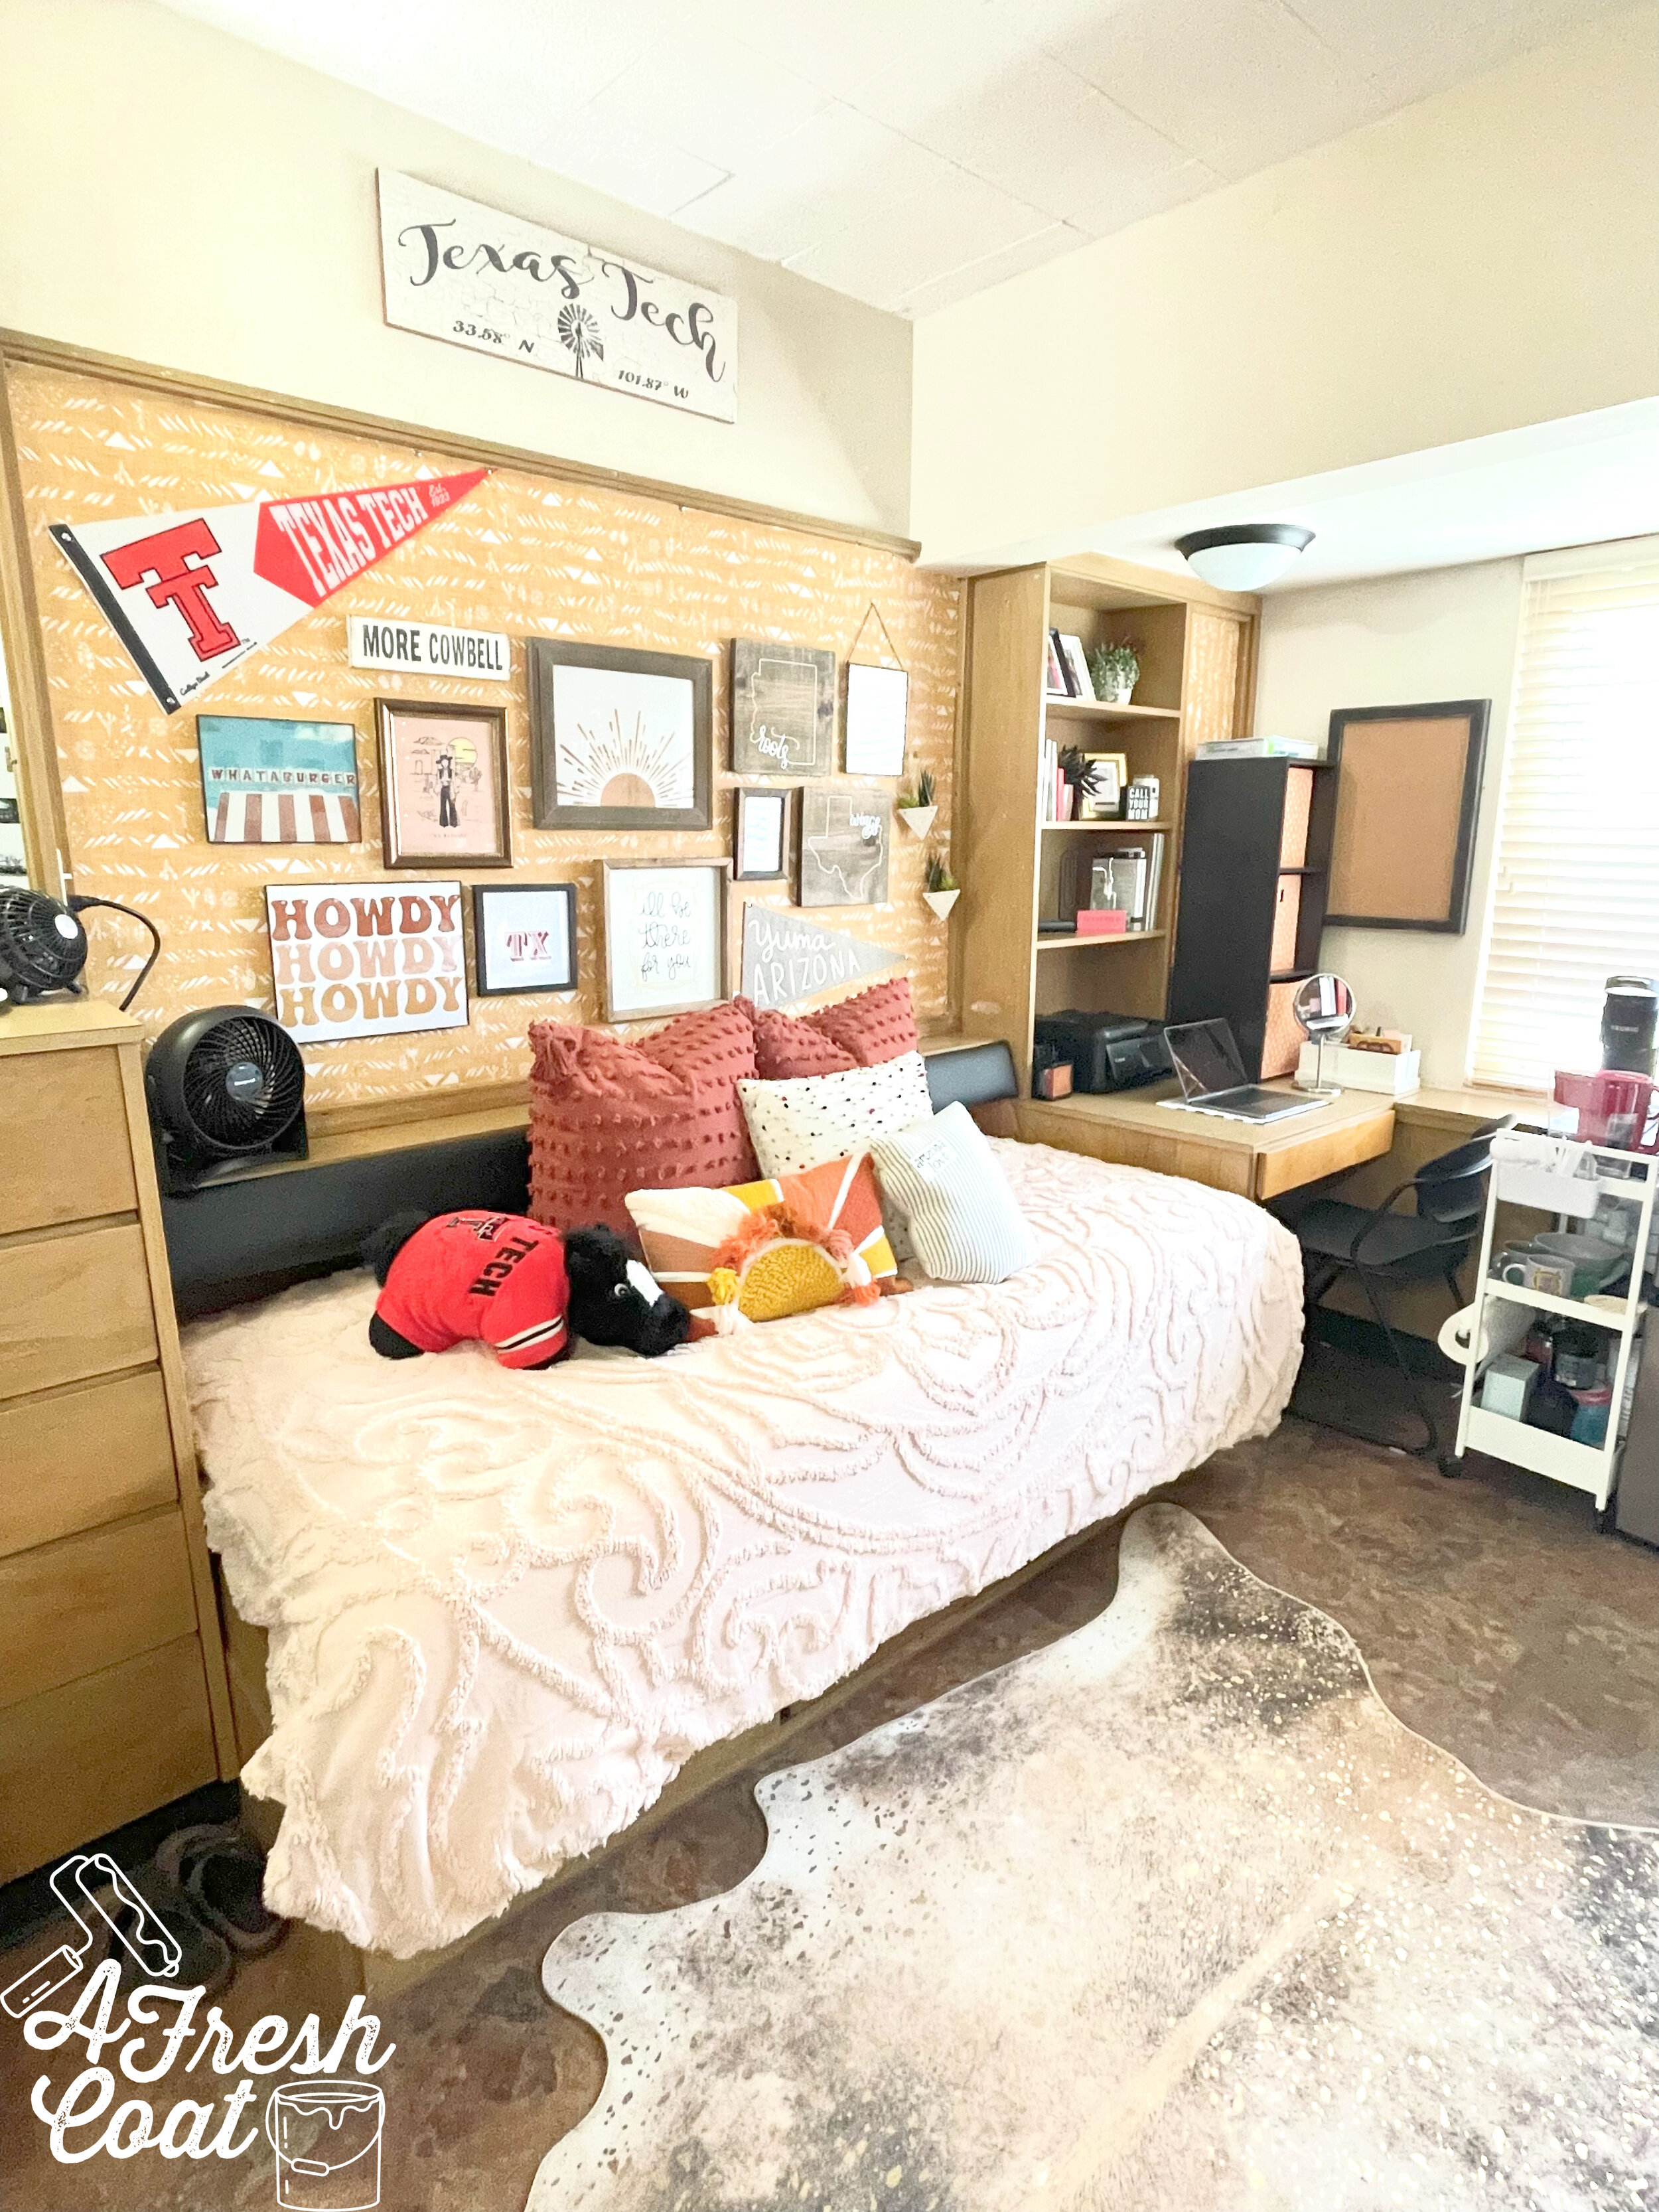
To everything there is a season, and the seasons have definitely changed here on my end. My sweet girl turned eighteen last month and we just moved her into her dorm room on the campus of TTU this past weekend.

Ugh.

I have to tell you, it’s a completely surreal experience in doing so—remembering the time when I moved into the dorms myself, and then fast-forwarding twenty-five years later and doing the same for my daughter? Crazy.

The cool thing though? Dorm rooms have come a long way.

Don’t get me wrong—the hall my daughter was placed in is old—like, older than me kind of old—but the actual decor and improvements one can make to customize their dormitory is pretty awesome these days.

See for yourself. Here is where we started.

IMG_2156-1.jpg

Small quarters for sure but the beauty in all of this is that TTU provided all of the dimensions for every single piece of fixed furniture in this space. From the windows to the closet, to the height/width/and depth of the dresser—everything we needed to plan for was provided to us…and so the selection of decor began.

As always, it starts with the vision board. My girl wanted to incorporate her favorite color (yellow), and mix it up with a series of art pieces, slogans/sayings, and TTU decor in a fun way.

Bringing in warm colors, and a really fun faux cowhide metallic rug, along with a nod to her desert roots and Texas wings is what this space is all about. After purchasing each of these items, and then packing them, they all made the big move across two states to reach their final destination: TTU!

It took us eight long hours to whip this place into shape and went a little something like this;

TTU Dorm Room 3.jpg

Her “little” brother got right to work assembling her storage cart…and bringing in all the items we hauled from Yuma.

And there was a LOT of stuff!

So we got to work…

Once all of her items were put away and assembled, the decorating began. We started with the removable wallpaper I purchased from Spoonflower via Amazon. Super easy to install and made all the difference by providing a huge pop of color.

Next came the tricky part—attaching the gallery wall items to the wall without damaging anything in the process. By using heavy duty velcro command strips and putty, we managed to get all of these up (and hopefully staying put), quickly.

Ready for the reveal? Here we go…

TTU Dorm Room 5.jpg
TTU Dorm Room 6.jpg

Finding frames that were super lightweight and ones that could work well with push pins was key to hanging all of these items effectively.

TTU Dorm Room 7.jpg

Everything came together seamlessly…

TTU Dorm Room 8.jpg
Dorm Room 9.jpg

Roommates! These sweet girls are going to have such a blast in their first year at Tech. So excited for them both. Curating and collecting items for this space and setting up my daughter’s dorm room with her was one of my fave experiences at a parent. Saying goodbye? Not so fun (and a little messy on my end) but it’s all part of this parenting gig.

THE DETAILS

Wallpaper: Spoonflower via Amazon

Closet Curtain: Hearth & Hand via Target

Throw Pillows: Target, Dandy Home & Ranch, Amazon

Bedding: Target

Gallery Wall: Etsy, Society 6, Fearfully Made Creations, Amazon, Rebel & Rove, Red Raider Outfitters

Frames: Hobby Lobby, IKEA

Additional Decor: IKEA, Hobby Lobby, Dandy Home & Ranch

Faux Plants: Hobby Lobby

Storage Tower & Cubbies: Target

Area Rug: Amazon

Rolling Cart: IKEA

LA BANDITA BONITA PLAYROOM

Play RoomsJenny SulpizioComment

They say “variety is the spice of life,” and seriously, when it comes to decor and design—I couldn’t agree more.

This room and the process of creating and finishing this space is the perfect example of why I love what I do…and feel unbelievably blessed to do so. It’s the creative process—it’s bringing in color, and texture, and furniture, and the perfect pieces (big and small), and tying it all together.

This playroom was no exception.

When I met with the “B” family to discuss the vibe and vision for this room, my client was adamant about one thing: color! She wanted color in this space and lots of it. She wanted a Spanish vibe and a gentle nod to our desert Southwest locale in addition to. And most importantly? She wanted this area to be a fun, friendly space her kids (and their friends) would want to hang out in.

Here is where we started.

These neutral walls and beautiful hardwoods were about to get a big splash of color. But you know how this works—first comes the vision board! The starting point where we pick and choose from, visualize the overall concept, and finalize the details.

IMG_1707.jpg

After making selections, it was time to balance things out. For instance—the couch. A navy blue velvet sofa can be pretty expensive…unless you visit Big Lots and have one shipped on the cheap. Remember—this is a kid’s space so spending a lot on an item that may get used (and overused) may not be the best use of funds. Same with the rug (Home Depot for the win).

However, that chandelier? The one the kiddos can’t reach and is looking all bougie in lieu of the ceiling fan that once graced this spot—that item justified the slightly more expensive price tag. I’m smitten with that baby!

After months of curating art pieces, wall decor, shelving accoutrements, furniture, rugs, draperies, and the likes—this playroom is finally complete. Ready for the reveal and all of the details that went into making La Bandita Bonita Playroom? Here we go…

Okay—I. Love. Every. Single. Piece. I don’t think I have ever used so much color in one room but am loving how vibrant, fresh, and playful all of it looks together.

This playroom has so much to offer in that there’s seating for seven, storage for toys and books, an art table with ample room to store all art supplies, and a super cozy, welcoming spot to make some awesome memories, like this:

And after hanging out in the teepee, channeling one’s inner Van Gogh, watching movies or cartoons, followed by a serious session of “Barbies,” there’s only one thing left to do in this room…play dress-up!

Look how adorable these costumes are! That Queen of Hearts dress is too, too cute. Paired with these Dandy Home & Ranch shelves, Rebel and Rove decor, and original Etsy folk art, this wall is all gussied up and the perfect compliment to the rest of this space.

THE DETAILS

Velvet Sofa: Big Lots

Kids Craft Table: Home Depot

Draperies: Anthropologie

Chandelier: Houzz

Area Rug: Home Depot

Yellow Kids Chairs: Crate & Barrel Kids

Moroccan Poufs: Etsy

Frames-Hobby Lobby

Artwork/Decor-Etsy, Rebel & Rove, Dandy Home & Ranch, Crate & Barrel Kids,

Shelves-Dandy Home & Ranch

Hanging Shelf-Kirkland’s

Throw Pillows: Hobby Lobby, Target, Dandy Home & Ranch, Etsy

Bookcases (4): Wayfair

Bookcase Crates: Target

Topiary-Wayfair

COMMERCIAL OFFICE RENOVATION ROUND #2

Commercial DesignJenny SulpizioComment

As part of a whole church renovation, I was given the awesome opportunity of being asked to design, configure, stage, and install a number of offices at Church for the City-Yuma, which included this shared space for two amazing people.

After chatting about likes, dislikes, needs, and necessities, the design portion of this challenge got underway and the vision board was quickly created and approved. But before I jump too far ahead, here’s where this office space began:

Once the LVT flooring was laid, this spot immediately became the storage area for decor, plants, boxes (lots of ‘em), and yes, chips and Cheetos.

T & T Office.png

With freshly textured and primed walls, this blank space was about to get all gussied up. Gosh, those Cheetos look good. No, really—it’s past 10:00 o’clock at night and I’m realizing I’m way hungry and in need of one of those tasty bags of orangey goodness.

Focus.

Okay, maybe ignore the Cheetos, and focus on the vision board outlining the overall vision for this office.

Ty & Tecia's Office.jpg

Beautiful green built-in cabinetry to line the entire back wall. Two matching desks, leather chairs, and one oversized area rug. This room proposal also included extra seating by means of a built-in ledge with barstools, but that was later scratched. In its place, we added a fun couch with some sweet pillows.

Ready for the reveal (or are you still thinking about Cheetos like I am)?

Here we go…

T & T Office 4.png

First things first, those beautiful cabinets were construced by Master Finishes and painted in Sherwin Williams Retreat. It’s such a pretty green and works so well with every element in here.

T & T Office 3.png

These desks are not only handsome but also super functional in that they’re able to raise up so one can also use them in a standing position. They have USB capabilities and outlets right on top. Nice!

T & T Office 5.png

When it came to decorating the shelves (which is always my favorite part), I visted a ton of stores including none other than the Goodwill.

T & T Office 6.png

Old leather bound books, a thrifted mirror, along with a number of other goodies completed the simple styling of these office shelves.

T & T Office 11.png

…and I couldn’t resist this sign either.

T & T Office 9.png

As part of the design, a place to relax was requested and this convertible couch is seriously swanky but also serves a purpose, too.

And I love that olive tree. In fact, I ended up buying one for my home.

Okay, one last look at the before pic followed by the “after.”

BEFORE

T & T Office.png

AFTER…the only thing left to do is to change out those vertical window treatments and this space is done.

T & T Office 10.png

THE DETAILS

Paint: Sherwin Williams Accessible Beige, Sherwin Williams Retreat

Paint Labor: A Fresh Coat-Yuma

Custom Cabinetry: Master Finishes

Area Rug: Wayfair

Desks: Coleman Furniture

Chairs: Dandy Home & Ranch

Decor: Goodwill, Home Goods, Rebel & Rove, Dandy Home & Ranch, Kirkland’s, IKEA, Target, Hobby Lobby

Olive Tree: QVC

Lamps: Target

Wall Clock: Wayfair

Love, J

Commercial Office Renovation

Commercial DesignJenny Sulpizio1 Comment

This might just be one of my faves.

What am I saying? They’re all my faves! Seriously, each room always gives me the opportunity to create based off of my client’s likes/dislikes, interests, and hobbies. Each and every space caters to my clients and is customized specifically to them.

Such is the case with this complete office overhaul.

With commercial spaces, I find that oftentimes, my clients spend a lot of time in their offices. More than just the 9-5 time frame, in fact. These rooms become their homes away from home and should be designed accordingly.

So when I was contacted to revamp this recently renovated church pastor’s office, I couldn’t wait to get started. After our initial consult, the design became crystal clear, and the creative festivities were immediately underway.

Here is where we started:

Office Remodel 4.png
Office Remodel 5.png

These pictures were snapped right after the flooring was refinished—beautiful LVT with grey hues meant that these walls needed a paint refresh—and that this space once occupied by pastor and church staff—would become soley his.

Ready? As always it starts with the vision board, and in this case, two vision boards would be needed: one for the office and another for the green room portion of this space.

Pastor Tyrone's Office.jpg
CFTC Conference Room.jpg

I’ll save the Conference/Green Room reveal of this reno for my next post, but the goal was to obviously tie these two areas together seamlessly…to bring in rich colors and textures, with bold contrast and an overall masculine vibe.

First up? The paint!

Office Remodel 7.png

Sherwin Williams Agreeable Grey was selected for the main walls while Sherwin Williams (Color of the Year) Urbane Bronze was chosen for the accent walls. This color combination together, with the floors and proposed wood finishes, was definitely going to bring this whole space up a notch (or two…or three).

Master Finishes was hired to complete the built-in cabinetry work and while that was in the works, the purchasing of all furniture and decor got underway by yours truly (my favorite part). But here is what I was envisioning post-paint:

Office Remodel 9.png

Alright, let’s just skip to the finished room, shall we? The first space of this two-part blog post is finished:

Office Remodel 10.jpg
Office Remodel 1a.jpg
Office Remodel 1b.jpg
Office Remodel 1d.jpg
Office Remodel 1.png
Office Remodel 1e.jpg
Office Remodel 1f.jpg
Office Remodel 1g.jpg

Such a big change and there is so much warmth mixed in with the masculine overtones here. Most definitely a home away from home.

One more of the before and after.

BEFORE…

Office Remodel 5.png

and AFTER

Office Remodel 10.jpg

Tell me—-do you lean towards cooler grey, or warmer tans when it comes to your home or office?

THE DETAILS

Paint Labor-A Fresh Coat-Yuma, AZ

Paint- Sherwin Williams Agreeable Grey and Urbane Bronze (Satin finish)

Desk-Dandy Home & Ranch

Built-Ins: Master Finishes-Yuma, AZ

Leather Couch-Wayfair

Accent Chairs-Wayfair

Coffee Table: Dandy Home & Ranch

Console Table: Wayfair

Area Rugs: Wayfair/Overstock

Decor: Dandy Home & Ranch, Hobby Lobby, Target, Goodwill, HomeGoods, Marshall’s, Dillards

Florals: Dandy Home & Ranch, Michaels, Hobby Lobby

Desk Chair: Wayfair

Map Art- Kirklands

Clock: Wayfair

Pillows: IKEA, HomeGoods

Scripture Wall Art: Dandy Home & Ranch

Library Lights: Amazon

Lamp: Dandy Home & Ranch

Floor Lamp: Wayfair

Canvas Prints: Easy Canvas

Trees: QVC, IKEA

AESTHETICally Pleasing

Jenny Sulpizio

Designing for commercial spaces is a really fun challenge for me. I love getting the opportunity to create a unique room or office that patrons will frequent day in and day out.

Such is the case with Flash Aesthetics.

Caitlin and James Watson were preparing to open up their own retreat right here in Yuma, AZ and I was so honored they asked me to help.

Considering that this unit needed to be transformed into an esthetician’s office, a decent amount of renovations needed to take place—all while attempting to get the biggest bang for the ole buck when it came to wall treatments and decor. With a main lobby/reception area, treatment room, hallway, bathroom, and office, there was a lot to get done in just a little bit of time. And since this space caters to services for both men and women, the design needed to lean slightly more masculine with some subtle hints of feminine flair.

After reviewing Caitlin’s Pinterest boards, here is what I came up with:

RECEPTION/WAITING AREA
Flash Aesthetics.jpg

TREATMENT ROOM

0.jpeg

BATHROOM

Flash Aesthetics Bathroom.jpg

I wanted to bring in bold elements, textures, and colors. The goal was to make this space beautiful, modern, functional, and fun.

WAITING ROOM/RECEPTION AREA

Prior to the remodel, this space was a blank canvas. With Swiss Coffee walls and charcoal grey carpet, we need to up the “wow factor” of this soon-to-be spa/salon.

FlashAesthetics 03.jpg
FlashAesthetics 04.jpg
Flash 13.jpg

TREATMENT ROOM

The designated treatment room was simply an extension of the rest of the office, and we needed to trick this baby out in order for it to stand out.

FlashAesthetics 02.jpg

BATHROOM

Last but not least was the bathroom. Clients would be using this space to change, use the restroom, wash their hands, etc. While small, it still needed to be cute and pack some serious punch.

FlashAesthetics 01.jpg

After a couple months of planning, painting, and working, here is the almost totally completed space (a few wall decor items are next on the list).

FlashAesthetics 05.jpg

This chalkboard feature wall will showcase monthly specials and products, while the the custom made industrial shelving and (amazing) reception desk add so much warmth and character to this previously bare space.

Flash 15.jpg

Check out this glimpse down the hallway and those freshly painted black doors…

FlashAesthetics 07.jpg

Next up? The waiting area! Bold colors, and patterns (hello, lightning bolts!), mixed with a super fun cowhide rug and industrial coffee table. A black trimmed round mirror adorns one wall, and new art will soon grace the empty wall above the sofa. This place is definitely coming together.

Photo Credit: Caitlin Watson

Photo Credit: Caitlin Watson

And how about another feature wall? Master Finishes busted out this concrete textured wall that makes this whole room pop. In addition to, that custom steel sign (yes, it lights up) looks all sorts of awesome.

FlashAesthetics 06.jpg

This bad boy will soon have an industrial shelving box displayed below it to add more warmth and tie in the wood elements from around the room.

Moving on…

FlashAesthetics 11.jpg

Remember the treatment room that was totally bare and lacking character? Well, this is her now. A new grey leopard patterned area rug helps define the treament area, just as new credenzas bring warmth to the freshly concrete-textured feature wall in this room (yep-there’s another one). New blackout roller shades provide privacy, while the new shelving, and that sweet gold mirror work together to complete this space.

Flash 12.jpg

Before making our way into the newly renovated bathroom, check this out! A pink neon Selfie sign is located right outside the restroom and sits above this brand new mirror for what else? The perfect Selfie spot!

FlashAesthetics 10.jpg

How fun is that?!

Flash 16.jpg

Moving into the restroom, vinyl square flooring was added to give off a seriously cool vibe in this small space. Add a black feature wall, new gold trimmed mirror, light fixture, shelving and faucet—and this bathroom is completely transformed!

FlashAesthetics 09.jpg

It was such a privelege to work on this sweet space. I’m so excited for both Caitlin and James and thank both of them for all the hard work they put into this place.

Now, go see Caitlin at Flash Aesthetics for an amazing facial, waxing, or makeup!

The Details

Paint Labor: A Fresh Coat-Yuma

Paint: Chalkboard Paint (Black), Sherwin Williams Tricorn Black, Sherwin Williams Agreeable Grey, Sherwin Williams Mindful Grey

Rugs/Decor: Overstock, Hobby Lobby, Wayfair, Lowe’s

Vinyl Flooring: Lowe’s Home Improvement

Concrete Texture Feature Walls—Master Finishes

Reception Desk/Shelving: James Watson, JRP