A Fresh Coat

Beauty on a Budget

Teen Girls RoomJenny Sulpizio

Moving into a new home is not only exciting but oftentimes overwhelming. Will your old furniture work in the new space? What about window treatments, and kids rooms, and the kitchen? See?!! There is a lot to consider and just as much to plan when creating the design for your new (or new to you) home.

Such is the case here. Mrs “T” just moved into a beautiful home in historic Hettema (I’m really not sure if it’s historic but it sounds good, and I love that neighborhood, so we’re going with it). Anyhoo, she has four kiddos and wanted to give them rooms that were pretty budget-friendly. She set each room at $500.

No paint was needed.

No large furniture was needed either.

Bedding needed to be addressed.

New draperies were in store.

Area rugs were a must.

Minimal decor

Icksnay on the throw pillows.

And here is where we started.

The first room belongs to a sixteen year-old girl. Considering that her headboard had some glam to it, and the walls were a light blue, I wanted to add in some pinks, whites, and incorporate a few more glam-ish (that’s not a word but go with it) details.

Budget Beauty copy.jpg

Once I got home, I constructed the vision board and finalized the details with Mrs. “T.”

Twomey Girl 1 Bedroom.jpg
budget Beauty 2-4.jpg

The duvet cover was my absolute favorite. It’s seriously stunning in person. Not only that but it was on clearance. Those are some of my favorite words. Isn’t it pretty?!!

Budget Beauty.jpg

I also love the pom panels. This room needed four of them and they were such a reasonable price (like, a steal!). However, I think my most favorite part of the whole room is that chandelier floor lamp with violet crystals. For a little over $100, it makes the room and keeps that glam vibe going.

Beauty on a Budget.jpg

I love this mini makeover because it just goes to show what you can do on a budget and how much you can really stretch your dollar when you need to.

THE DETAILS

Bedding: Pottery Barn Teen

Side Table: Amazon

Draperies: Amazon

Floor Lamp: Wayfair

Love, J

Courtyard Conversion

CourtyardsJenny SulpizioComment

This was a first for me but after receiving a message seeing if I would like to remake a beautiful courtyard in the La Quinta subdivision, I was totally on board. Recently remodeled with an outdoor entertaining area and beautiful pavers, this space just needed a little “umph” to get all those parties (it was made for) started.

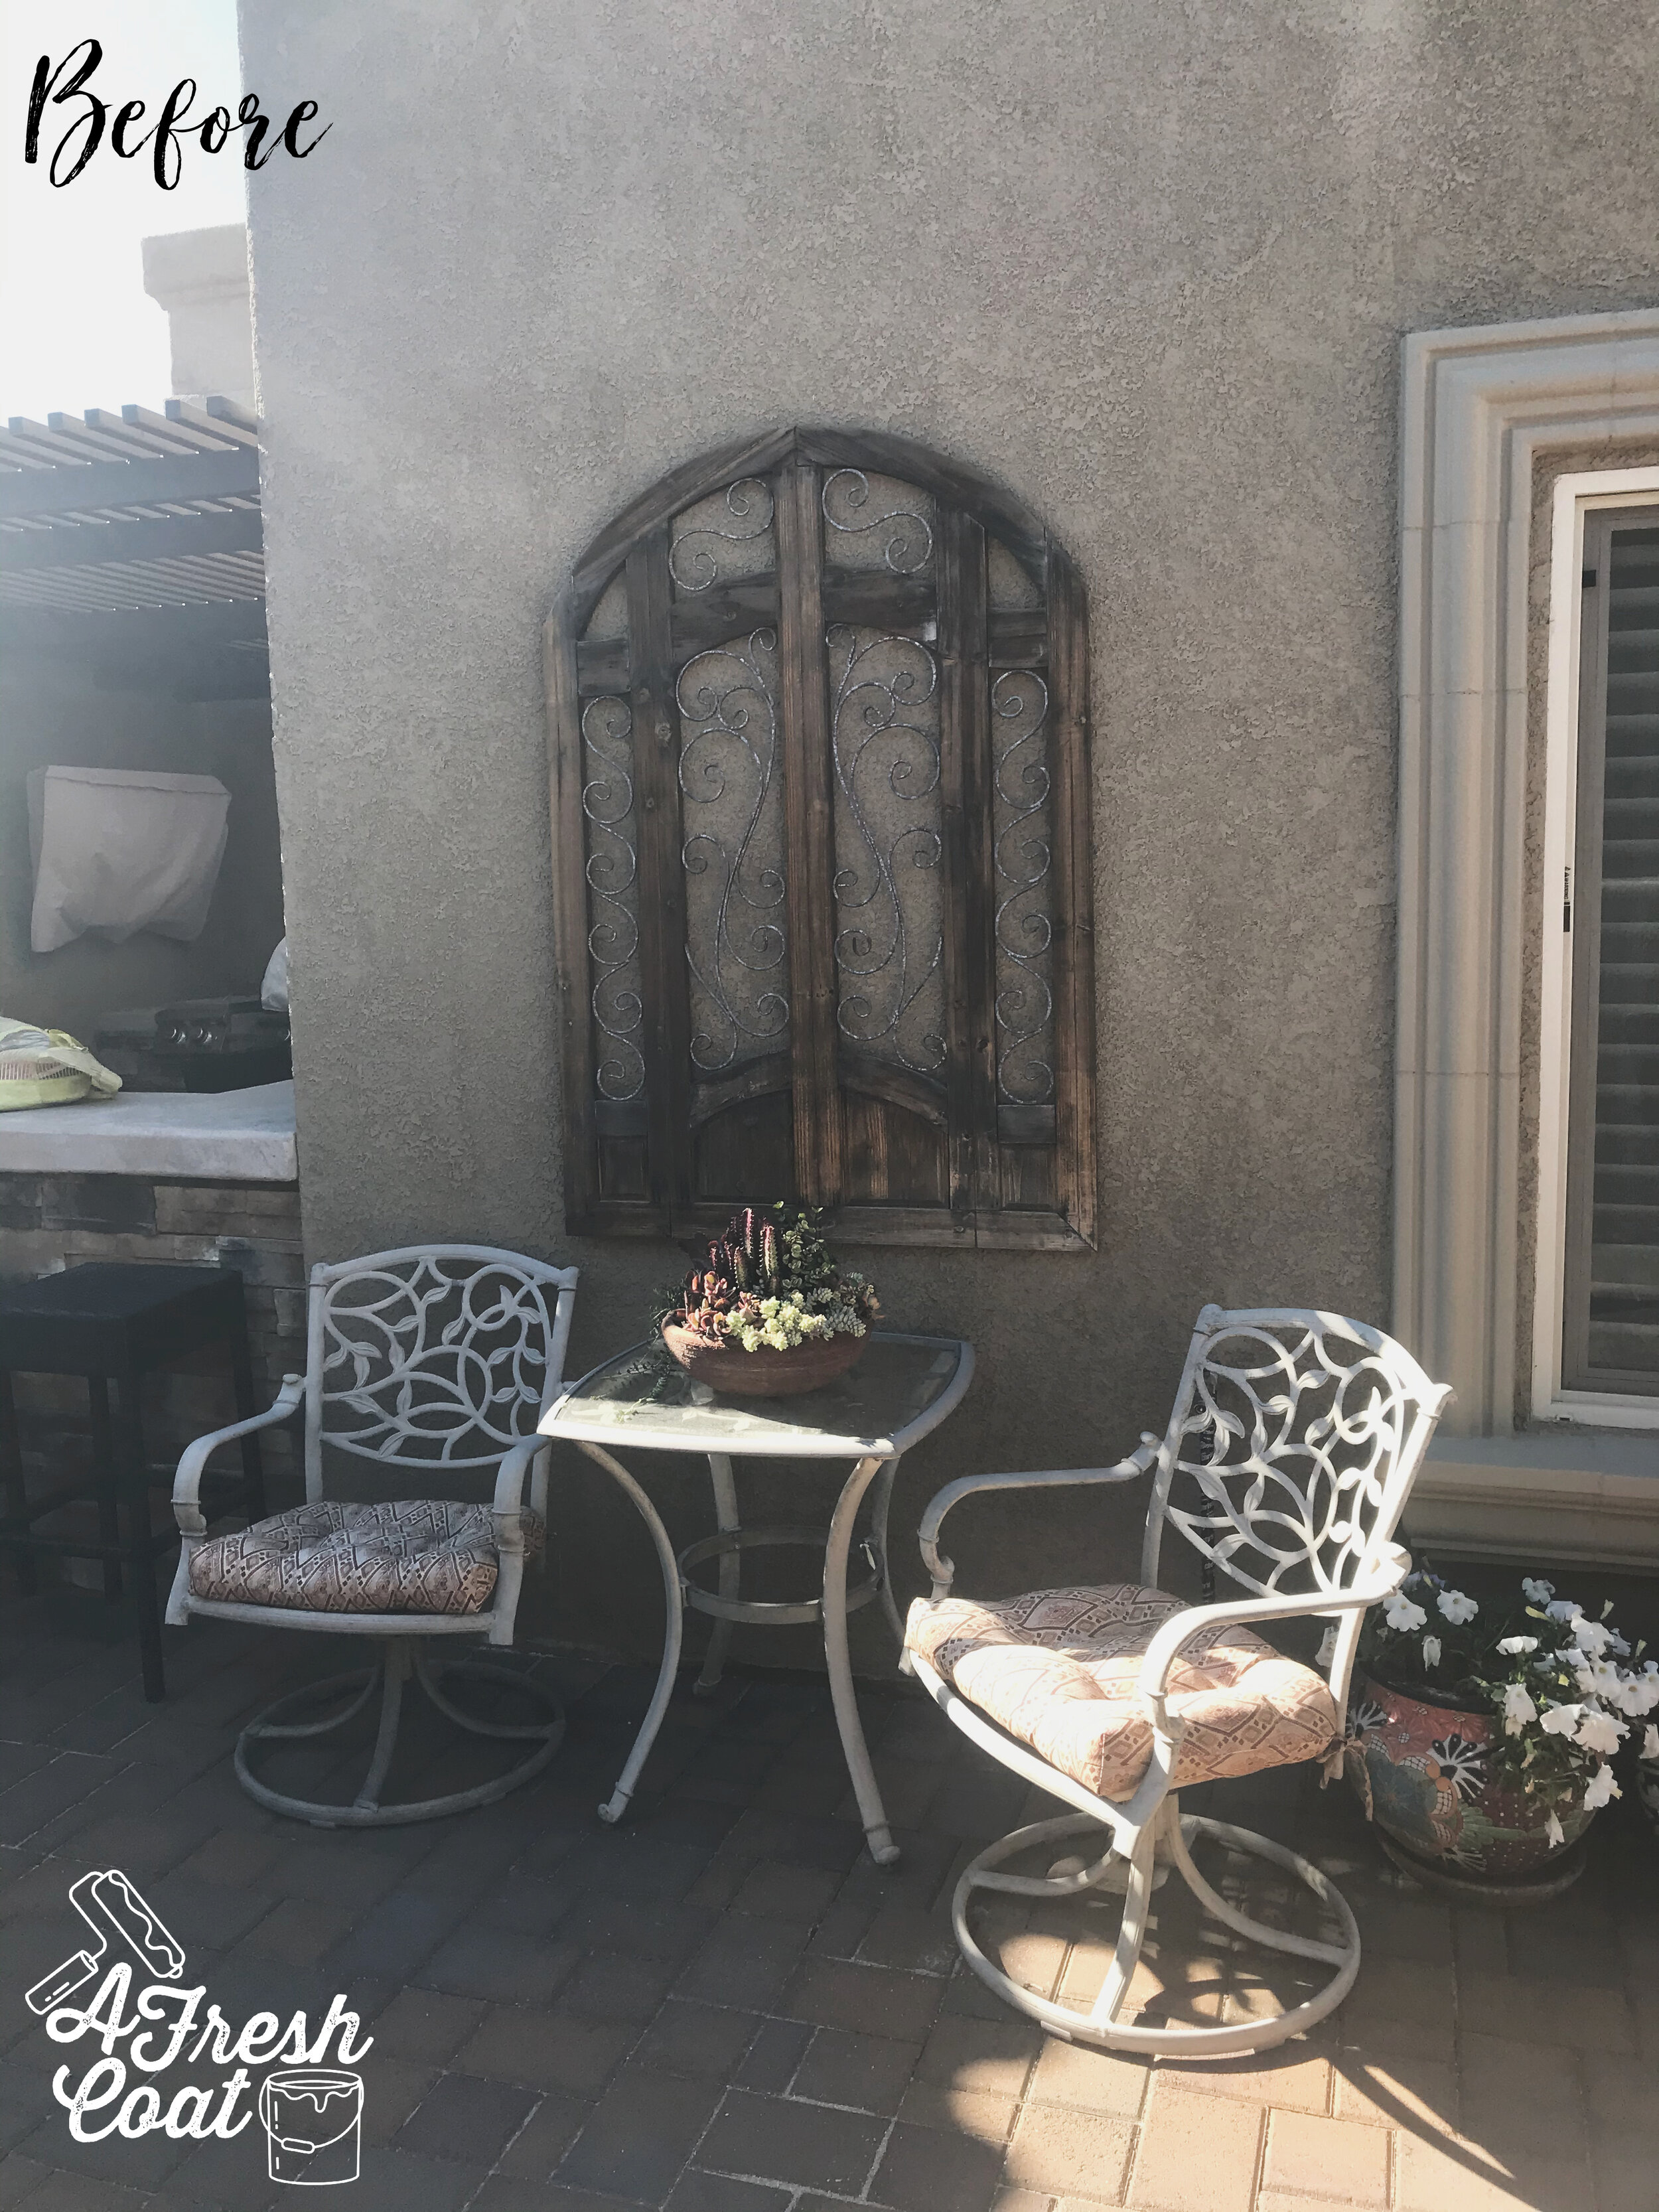
But first, the “before” pics:

Courtyard Conversion 12.jpg
Courtyard Conversion 13.jpg
Courtyard Conversion 10.jpg

Beautiful space, right? After talking with Mrs. “C” at our consult, we decided on a subtle Tuscan theme using both real and faux plantings. I knew I wanted to add some trellises on the large wall that separates neighbors but since there was no water source, creativity was needed!

This was kind of out of my wheelhouse but a project I totally wanted to tackle because it was new and different and all sorts of fun. As always, the vision board really helped the overall plan get underway.

Some images courtesy of Pinterest

Some images courtesy of Pinterest

Ready for the reveal? Me too! After a couple of months planning this gem, I’m really happy with how it turned out…and more importantly, so is my client.

Courtyard Conversion 9-2.jpg

Now, the details are a little hard to see from this view so I’ll zoom in and give you the scoop on it all.

Courtyard Conversion 6.jpg

The first thing was addressing this bistro set. Scroll up above again and see the before pic. There was no reason to part with this set because it really just needed some new paint to bring it back to life. It took about four cans but seriously, I sooo love it! No cushions needed either.

Courtyard Conversion 4.jpg

Another item that needed to be dealt with was the outdoor furniture cushions. This set was beautiful but the pattern on the cushions was dating it. Mrs. “C” put a call into the manufacturer to inquire about replacement cushions and we decided on this beautiful color together…and more pillows. And succulents. Lots and lots of faux and real succulents with a mixture of wood and galvanized steel elements. Yass!

Courtyard Conversion 3.jpg

And even more succulents…this time paired with some rustic candlesticks. No candles needed but if you did want to add some lighting for at night, LED battery-powered candles are always a good idea.

Oh, and see that trellis attempting to photo bomb the pic? There are four of those guys on this wall that separates The “C’s” from their neighbors. As mentioned before, it’s a long wall with nothing on it, but we needed to break up the monotony of it all and added trellises.

Courtyard Conversion.jpg

Since this area gets TONS of sun and the summer months are no joke around here, the goal will be to purchase planters and then weave faux vines up into the trellises. This will add color to that wall, will be low maintenance (as in none), and will look amazing!

Next up the BBQ area. Scroll up one more time and check out the before pic. See all that empty space on the walls? Exterior stucco can be drilled through using a specific bit…and drilled it got with you guessed it—succulents!

Courtyard Conversion 5.jpg

Man, I love them. As detailed in my IG stories (the day we installed these guys), these were brand new and came in a beautiful gold finish. However, the gold just blended into the wall and didn’t pop at all. So, spray paint to the rescue! Now black, this outdoor wall element filled with beautiful faux greenery is quite a looker.

Here it is up close.

Courtyard Conversion 1 .jpg

Last but not least, the outdoor dining area. Not much needed to be done to this beautiful piece but AFC decked out the table with new dining pieces from Hobby Lobby and a few decor items too.

Courtyard Conversion 2.jpg


This place is definitely ready for a party!

The Details:

Rug: Wayfair

Trellises: Wayfair

Succulents: TJ Maxx, Dandy Home and Ranch, Lowe’s, Target, HomeGoods, Hobby Lobby

Servingware: Hobby Lobby

Pots: Lowe’s, HomeGoods, TJMaxx, Target, Dandy Home and Ranch

Wall Planters: Dandy Home and Ranch

Lanterns: Target, Lowe’s

Pillows: Wayfair

Love, J


BOHO PLAYROOM

Jenny Sulpizio

I love creating spaces for kiddos…especially playrooms. It’s this additional flex space just for kids and an area they can call their very own. You know—a space away from the family room that’s just perfect for them as well as all their gadgets and toys. It’s a brilliant move on the part of builders (if you ask me) and I think buyers will agree.

“H” is still only five years old so we wanted to create a space that would grow right along with him, was gender neutral (he’s getting a little sister pretty soon), and would tie in to the BOHO style his mama (and I) love so much.

Here’s the “before” pics.

BOHO Teen Room 1.jpg
BOHO Teen Room 2.jpg

Sometimes these flex spaces can become a “catch-all” of sorts when not properly defined. And with limited lighting based off of the direction the home sits, this area of the house just didn’t seem happy. But all that was about to change. Together, Mrs. “M” and I came up with some really fun ways to create a great space that would house plenty of toys and inspire lots of creativity…in true Bohemian fashion.

Here is the vision board:

Moneypenney Playroom.jpg

But first, the paint. Dogwood Petal and Butcher Block for the win again. The cool thing though? This space was getting a pretty fun (yet super simple) accent wall using those exact colors. Accent walls are a great way to add personality and character into a room, as well as drive up the value of your home if done right.

Once the first coat of Valspar’s Dogwood Petal had been applied and allowed to cure for 24 hours, the taping began. Now usually a level is a great idea. In fact, I actually own a big-dog level I use for projects such as this. However, when you forget your level and are crunched for time, you use your eyeballs and some tape to get you where you need to go. Such is the case:

BOHO Teen Room 3.jpg

Luckily for me, my eyeballs were in good working order this day and all came out perfect. I love when that happens!. I’m sure my clients do too. LOL

BOHO Teen Room 4.jpg

Once the paint job was finished, it was time to decorate (my favorite part). Working closely with my client, she ordered all items I requested (she’s awesome) and I made a quick trip up to San Diego to get the ones that were going to cost a literal arm and leg to ship (I’m talking to you, IKEA!).

Anyways, after a full day of decorating this baby, look at her! I’m unbelievably ecstatic with how this room turned out (Side note: I get just as excited as my clients do when it comes to creating and implementing their new spaces. True story).

BOHO Teen Room 1.jpg


Seriously, this room makes me so happy. Like, “I-just-want-to-sit-in-there-and-color” kind of happy. I’ll link all of the details below but before I do, more pictures!!

BOHO Teen Room 2.jpg

And what about that accent wall, you ask? Here it is. ;)

BOHO Teen Room 3.jpg

Also? How about that adorable piano in th back? I so love that!

BOHO Teen Room 4.jpg

How great is that storage rack by the way? Filled with books, and toys, and everything you want to keep hidden yet still accessible. Mrs.”M” scored those at Target and they are so handy!

BOHO Teen Room 5.jpg

Right beneath the windows is a perfect spot to read and play, and dream the day away thanks to IKEA’s TROFAST storage units in light pine finish.

BOHO Teen Room 6.jpg

Do you see what I see? I mean besides the awesome storage rack and fun decor area? I see tassels! These curtains are perfect for this space! The bummer? They didn’t have the size we needed so I resorted to my old trick of adding material to the bottom to make up for the length. And? I like it even better with the black border. Nice!

Okay, one more time and then I’ll give you all the information on this room. Before and after…

BOHO+Teen+Room+1.jpg
BOHO Teen Room 1.jpg

THE DETAILS:

Paint: Valspar’s Dogwood Petal and Butcher Block, Eggshell finish

Chalkboard: Amazon

Rug: Wayfair

Kid’s Desk & Chairs: Wayfair

Trofast Storage Units and Bins: IKEA

Faux/Real Plants: IKEA/HomeGoods/Lowe’s/Target

Curtains: Target

Curtain Rods: Amazon

Oversized Arrow: HomeGoods

Pillows: IKEA

Swiss Cross Vinyl Decals: Amazon

Storage Baskets: Target

Macrame Plant Holders: Amazon

Shelving Unit: Wayfair

Shelving Decor: Hobby Lobby

Love, J


Boys Bathroom Redo

Jenny SulpizioComment

Mrs. “G” called me this past summer with a problem many of us share: her guest bathroom was in need of a major revamp. Thing is—her guest bathroom also doubled as the restroom her two boys used which meant the space needed to be fun (yet functional) AND appeal to the masses.

Here is where we started:

Boys Bathroom Makeover 8-2.png
Boys Bathroom Makeover 9.jpg

This bathroom appeared dark and with only one light source and no natural light coming in, the dark brown feature wall and adjacent taupe walls made it feel closed in…yes, even with 10’ ceilings.

After chatting with Mrs. “G” about her vision for the space, she wanted to make sure it had character—some fun elements her boys would enjoy—but also contained decor that guests would like as well. And so the vision board was created.

Images Provided by Pinterest

Images Provided by Pinterest

In our consultation, Mrs. “G” discussed going with a light gray on the walls but after thinking about it and looking at some of the decor in the remainder of her home, I suggested a bold blue. Somewhere inbetween Teal and Navy. I also suggested board and batten moldings in bright white to break up the blue (remember—-no natural light source). I wanted the overall look to appear fresh and clean, yet provide a lot of personality.

Before I got my paint brush out, the board and batten had to go up. Luckily, the “G” home did not have textured walls like most of us here in AZ do. Her walls were mostly smooth but had a slight skip trowel/Mission finish—perfect for the moldings we were going to implement.

Her crew got to work. In fact, here’s a little “in-progress” shot:

Boys Bathroom Makeover 10.jpg

I love progress shots. It means change is occurring and the final reveal is right around the corner. But before I get too far ahead, a few other elements needed to be addressed:

  1. Functional Shelving

  2. Framed mirror

  3. New countertops (builder grade had to go)

  4. Cabinet color change (courtesy of Mrs. “G”)

  5. New Decor and hooks

  6. Fresh paint.

Ready for the finished product?

Boys Bathroom Makeover 1.jpg

Huge difference, huh? I love the pop of color Valspar’s Flood Tide brings in, and mixed with the Sherwin William’s Alabaster trim, it takes this bathroom from dark (and slightly dungy) to fresh and fun.

Boys Bathroom Makeover 2.jpg

These signs are awesome, too. With two boys, guests are sure to laugh at first sight. 24” ledge shelving (made by Fearfully Made Creations) and stained by A Fresh Coat help bring in one more area of interest. I just love this color palette we went with.

Boys Bathroom Makeover 6.jpg

Brand new countertops with an undermount sink, a new faucet, and freshly painted black cabinetry. Not to mention that framed mirror! Moldings really change the entire look of a room. They add so much for so little. This was a builder’s grade mirror before (see pic below). Four pieces of lumber, some stain, and some liquid nails and bam (!), a custom look is achieved.

A new light fixture was also purchased and installed.

Boys Bathroom Makeover 5.jpg

New vanity decor should never be overlooked either. These awesome Rae Dunn pieces are super versatile in that they look great in adult and kid’s spaces alike. Purchased at Marshall’s, they were really reasonable too.

IMG_2190 2.jpg

A place to hang their towels was also important. Pictures of the boys will soon adorn this wall but in the meantime…

Boys Bathroom Makeover 3.jpg

Ready for the before and after one more time?

Boys Bathroom Makeover 8-2.png
Boys Bathroom Makeover 1.jpg

How great is that shower curtain by the way? Wal-Mart for the win there but here’s a little secret—the black border on the bottom of this curtain was added in in order to add length. Oftentimes, ceilings are higher in newer homes (10’ or more). This makes it hard finding shower curtains that don’t look too short for the space because they usually only come in standard sizes (most of the time). By adding some fabric to the bottom, it remains inexpensive and you’re able to get the height that you need to make the area and its decor more proportionate.

Balance is key and so is creating a space that everyone can love.

Love, J

The Details

Paint: Valspar’s Flood Tide/ Sherwin William’s Alabaster

Paint Labor: A Fresh Coat-Yuma

Cabinetry Paint: Mrs. “G”

Shower Curtain: Wal-Mart

Wood Decor Signs: Etsy

Shelving: Fearfully Made Designs

Curtain Rod: Amazon

“Man” Decor: Hobby Lobby

Light Fixture: Lowe’s

Rae Dunn: Marshall’s


Boho Chic Teen Girl Room Makeover

Teen Girls RoomJenny SulpizioComment

This room.

This one right here?

It took almost two years to complete! TWO YEARS!

Sometimes clients can’t make up their minds. Other times, they change their minds mid-project which adds time and money to the original plans.

And then sometimes you have the toughest client ever…one you just so happened to also give birth to.

Ladies (and if there are any dudes reading this), gentlemen—Annie’s room is finally done! Finally! This girl almost killed me in the process thereof but it is finished…and I am so glad. Plus, I really love how it turned out so all the details are being shared below.

Here we go…

Boho Chic 1.jpg

For whatever reason, I cannot find my “before” pics from when we first moved in, but trust me when I tell you that the walls were ugly. Four textured walls in a pale (ish) yellow color that was anything but fun. So, we got to work.

I asked Nate Koogle to add interest by creating this feature wall of boxed moldings and he totally rocked it. AFC painted it SW Tricorn Black to add some “pa-pow” to the room. The remaining walls were redone in SW Snowfall, and the ceiling got a coat of bright white ceiling paint to top it off.

About mid-way into this makeover, we had a bug infestation. Like, a gross one. Annie had to vacate the room. Luckily it was contained but after ripping up her carpet, I decided that the flooring I eventually wanted to replace the rest of my home with, should go in there instead. And so it did.

Boho Chic 5.jpg

One thing was certain about this space: Annie wanted Boho. She loved the simplicity of a minimalist type of space with the freedom of style that Boho provides. The inspiration? The beautiful butterfly poster art we found at Dandy Home & Ranch. From this one piece we added in warm, bold colors of yellow (pillows and blankets) and Jade green (velvet European pillows).

Boho Chic 2.jpg

I found the wicker headboard from a friend locally, and the basic nightstands from IKEA (super cheap). Copper table lamps were purchased on clearance from Hobby Lobby and the bedding was found through Amazon.

If you look closer at the bedding in the top pic, you’ll notice the white pom fringe on the ends. I purchased black pom garland and had it added to to give a little more detail and contrast with the bedding. I love black pom garland anyways and I just think it kicks the bedding up a notch.

Boho Chic 4.jpg

Annie is a minimalist when it comes to her style (as mentioned earlier), and the other half of her bedroom represents this well. IKEA shelving extends in a single row all the way across the top of her South-facing wall. Plant hangers and pots accentuate the corner while a beveled mirror and basic white desk (Pottery Barn Teen) finish the space.

As for the large white wall in this area? Annie has a projector she connects her phone to in order to provide an instant (and super large) TV. That space will remain bare for her viewing pleasure.

Boho Chic 3.jpg

A modern but simple ceiling fan was added to complete the look. Ceiling fans are a must here in AZ and this one was just too fun not to purchase.

I love this girl to pieces but man, she gave me a run for my money. On to the next room…

The Details:

Paint: SW Snowfall (satin), SW Tricorn Black (satin), Valspar Ceiling Paint (flat)

Paint Labor: A Fresh Coat-Yuma

Feature Wall: Nate Koogle

Arched Window Shutters: Hardin Development

Bedding: Amazon

Throw Pillows: Target, Dandy Hopme & Ranch, Amazon

Throw: Target

Nightstands: IKEA

Table Lamps: Hobby Lobby

Wall Decor: Dandy Home & Ranch, Hobby Lobby, Target

Shelving: IKEA

Rug: Target

Ceiling Fan: Joss & Main

Shelving Accents: Junk in the Trunk

Accent Table: Pier 1

Love, J